This is an old revision of the document!
<h2>OpenVPN Tutorial</h2>
<p>Setting up a VPN (Virtual Private Network) tunnel/connection from
  your computer to your Xirvik Seedbox server is a rather basic
  procedure.<br>
  It is also believed to be the best method available to maintain online
  anonymity. <br>
  If setup correctly the VPN will route all traffic through your seedbox,
  making you invisible to the outside world.</p>
<p>To ensure proper setup, and avoid problems, the process has been outlined below.</p>
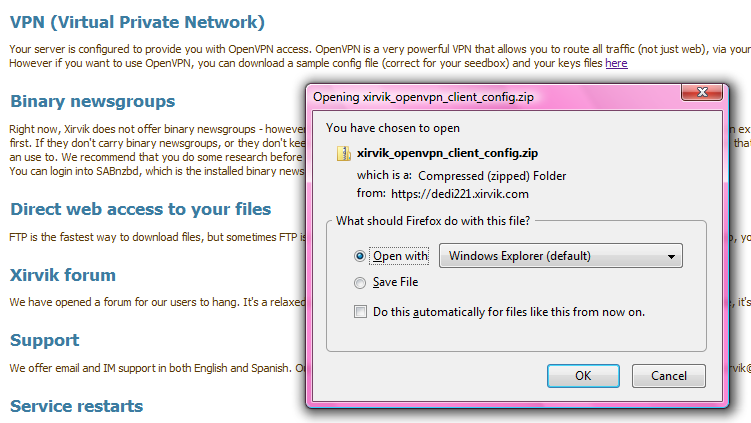
<p>Before we begin we must get our server's configuration files.<br>
  These are available from your main server page under the VPN section.<br>
  <br>
</p>
<p>Save the zip file anywhere, preferrably your desktop.<br>
  We'll get back to it later.</p>
<br>
<strong><a name="toc" id="toc">Table of Contents</a></strong>
<ul>
  <li><a style="color: rgb(0, 102, 255);" href="#windows"><strong>Setup on Windows</strong></a> <em>(Section 1)</em></li>
  <li><a style="color: rgb(153, 51, 0);" href="#linux"><strong>Setup on Linux</strong></a> <em>(Section 2)</em></li>
  <li><a style="color: rgb(0, 102, 0);" href="#mac"><strong>Setup on Mac OS X</strong></a> <em>(Section 3)</em>

      <li><strong><a style="color: rgb(0, 51, 51);" href="#testconn">Testing Your Connection</a></strong><br>
      </li>

</li></ul>
<br>
<h3><b><a name="windows" id="windows">Setting Up VPN On Windows</a></b></h3>
<h5>(Section 1) <a href="#toc">(Table Of Contents)</a></h5>
Let's start by downloading an installer which contains the necessary
  components to get the VPN running. <br>
We will be using the excellent, free,
  open-source, secure tunneling daemon, known as OpenVPN.
<p></p>
<p>The installation file can be downloaded from <a href="http://openvpn.net/index.php/open-source/downloads.html">this page</a>.</p>
<p>You have 2 options available for download. It depends on your Operating System and processor type (64bit/x64 or 32bit/x86).<br>
  If you have 32bit Windows XP or prior it is recommended to get the stable release (currently 2.09).<br>
  If you have Windows Vista, 7 or a 64bit processor, the beta series is the recommended choice.</p>
<p> 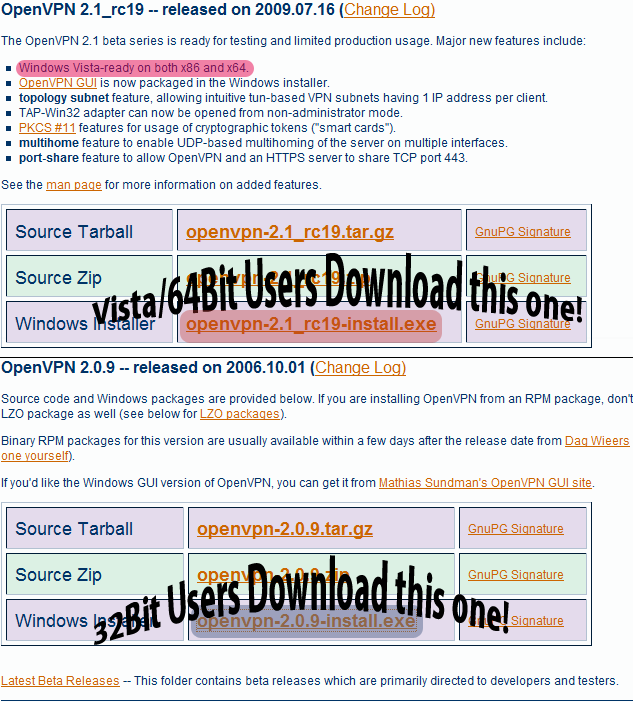
</p>
<p>If one doesn't work out for you, then try the other one.</p>
Download the setup file.<br>
If you have Vista or 7, prior to installation you must right click the setup file and select <strong>Properties</strong>.<br>
Go the <em>Compatibility </em>tab. <br>
<strong>Vista users</strong>: Select <strong>Run this program as an administrator</strong><br>
<strong>7 Users: </strong>Select <strong>Run this program as an administrator</strong> and select the <strong>Run this program in compatibility mode for</strong> checkmark and choose <em>Windows Vista</em>.<br>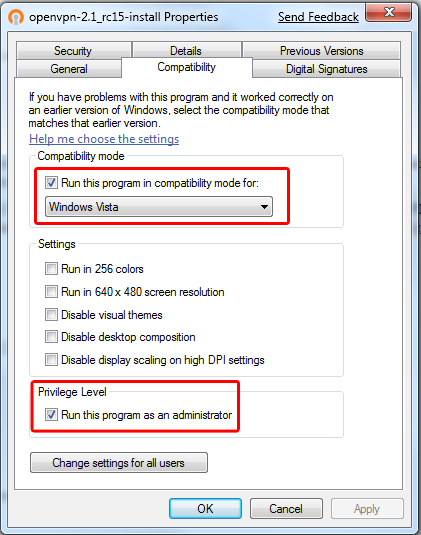
<p></p>
<p>Now hit OK and begin the installation process by double clicking the file.</p>
<p>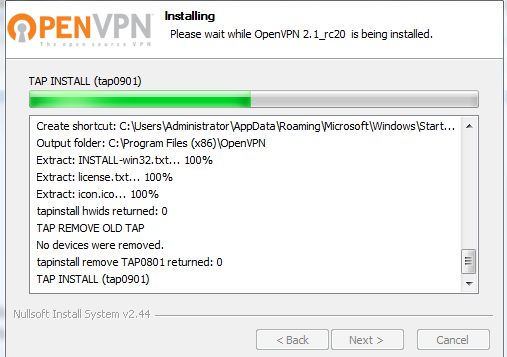
</p>
<p>After a successful installation, we can go back to our keyfiles we downloaded earlier and extract them using WinZip/WinRar.<br>
  Extract them to wherever you installed OpenVPN, in the <strong>config</strong> folder. Most likely <em>C:\Program Files\OpenVPN\config</em>.
</p><p>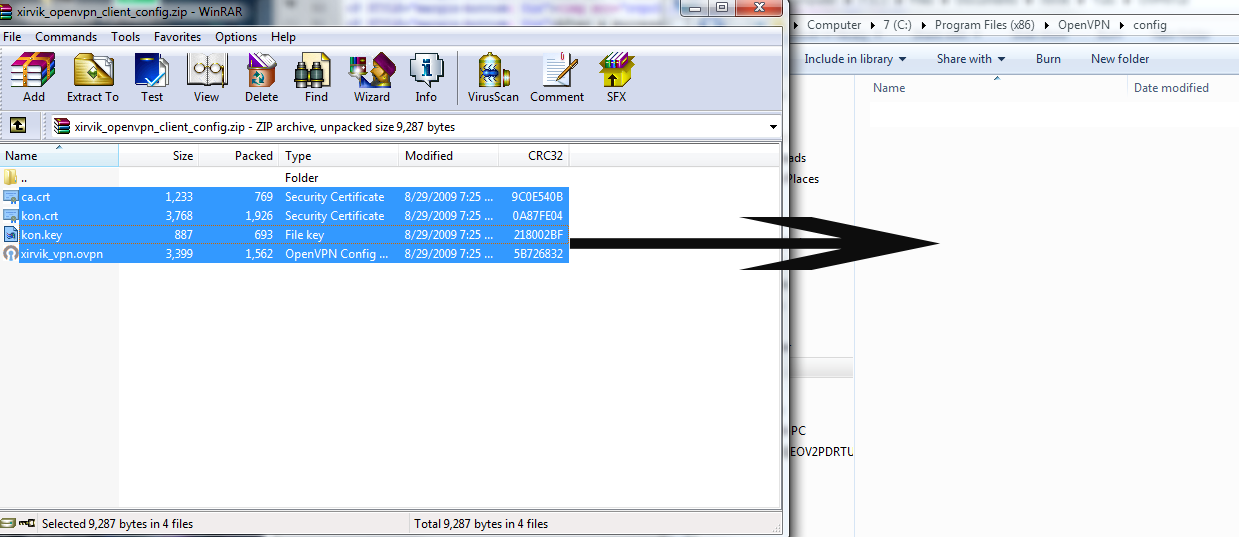
</p><p>Open the file titled <strong>xirvik_vpn.ovpn</strong> with notepad or another text editor such as textpad.<br>
  See the example below. <br>
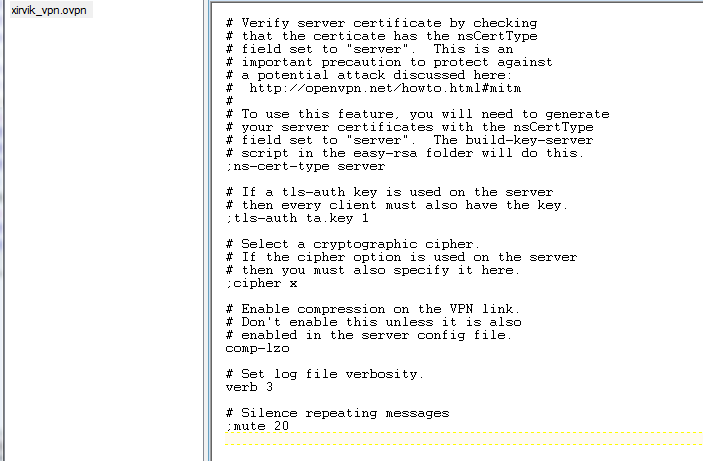
</p><p>At the very end of the document/configuration file enter the following code to route all traffic through the VPN. Don't forget to replace everything in parentheses with the proper information.</p>
<p><em><code>redirect-gateway def1 bypass-dhcp</code></em></p>
<p><em><code># Any DNS can go here<br>
  dhcp-option DNS (Primary DNS)<br>
  dhcp-option DNS (Secondary DNS)</code></em></p>
<p>Here is an example of the code, with real information.<br>
  If you're unsure about your DNS, you may use OpenDNS which is free and very good.<br>
  Copy the code below exactly if you'd like to use OpenDNS. </p>
<p><strong><code>redirect-gateway def1 bypass-dhcp</code></strong></p>
<p><strong><code># Any DNS can go here, i use OpenDNS<br>
  dhcp-option DNS 208.67.222.222<br>
  dhcp-option DNS 208.67.220.220</code></strong></p>
<p>Once finished entering the information, save and close your text editor.</p>
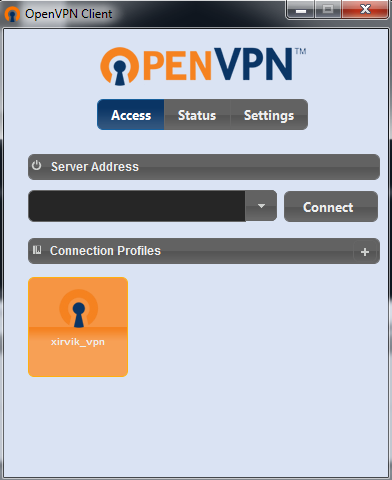
<p>Now let's try it out by opening the <strong>OpenVPN GUI</strong>.<br>
  A shortcut should be on your desktop.</p>
<p>
<br>
  <br>
  Look to the bottom right, and you should see a icon such as the one in the picture below..<br>
</p>
<p>Right click it and select <strong>Connect </strong>or simply double click the icon<strong>.</strong></p>
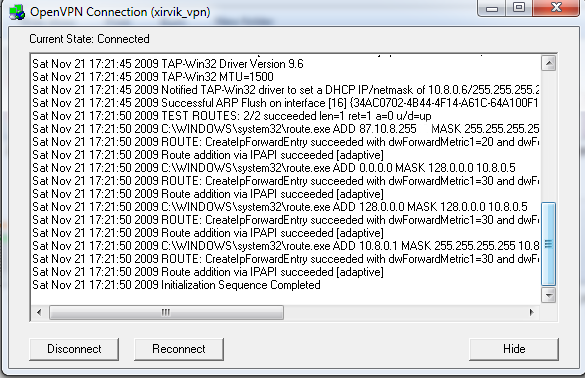
<p>The OpenVPN client will now try to connect to your VPN server.<br>
</p>
<p>Once connected the icon in your taskbar will turn green. 
</p>
<p>To verify the connection, <a href="#testconn">click here</a> to jump to the end of this tutorial and test your connection. </p>
<br><h3><b><a name="linux" id="linux">Setting Up VPN on Linux</a></b> </h3>
<h5>(Section 2) <a href="#toc">(Table Of Contents)</a></h5>
<p>In this tutorial we will be using the Linux Mint distribution, which is a variant of Ubuntu. Both are Debian-based operating systems.<br>
  Regardless of which linux distribution you have, installation should be similar.
</p><p>First let's open up our Terminal from the menu.</p>
<p>Enter in the following code:</p>
<p><code>sudo apt-get install openvpn</code></p>
<p>When asked if you'd like to continue type <strong>Y</strong> then press <strong>Enter</strong>.</p>
<p>This will automatically download and install the necessary files from the proper repository.<br>
  If for whatever reason this method isn't working for you, refer <a href="http://openvpn.net/index.php/open-source/documentation/howto.html#install">here</a> to manually install.</p>
<p>Once completed navigate to the folder you placed the certficate files we downloaded in the first step.<br>
  If you placed them on your Desktop it would be something like this:</p>
<p><code>cd /home/Desktop</code></p>
<p>Now we're going to Unzip the key files with downloaded in the first step to the proper directory.<br>
  To do this insert the following code and then press enter.</p>
<p><code>sudo unzip xirvik_openvpn* -d /etc/openvpn</code></p>
<p>If done correctly all the files will inflate into <em>/etc/openvpn</em>.</p>
Now we need to edit one of the files, <strong>xirvik_vpn.ovpn</strong>.<br>
Type the following code into the terminal.
<p></p>
<p><code>sudo gedit /etc/openvpn/xirvik_vpn.ovpn</code></p>
<p>The text editor should open up.<br>
  First we need to make sure the configuration file is properly reaching the key and authentication files.<br>
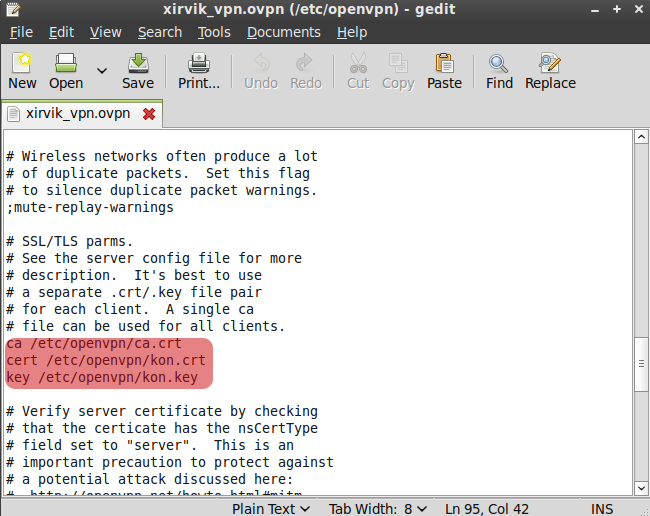
  Find the portion of the code that looks like the picture below, and change the <strong>ca, cert, </strong>and<strong> key</strong> locations to <em>/etc/openvpn/</em>.<br>
<br>
  Use the picture above as an example.</p>
<p>At the very end of the document/configuration file enter the following code to route all traffic through the VPN. <br>
  Don't forget to replace everything in parentheses with the proper information.</p>
<p><em><code>redirect-gateway def1 bypass-dhcp</code></em></p>
<p><em><code># Any DNS can go here<br>
  dhcp-option DNS (Primary DNS)<br>
  dhcp-option DNS (Secondary DNS)</code></em></p>
<p>Here is an example of the code, with real information. <br>
  If you're unsure about your DNS, you may use OpenDNS which is free and very good.<br>
  Copy the code below exactly if you'd like to use OpenDNS. </p>
<p><strong><code>redirect-gateway def1 bypass-dhcp</code></strong></p>
<p><strong><code># Any DNS can go here, i use OpenDNS<br>
  dhcp-option DNS 208.67.222.222<br>
  dhcp-option DNS 208.67.220.220</code></strong><code></code></p>
<p>Once finished entering the information, save and close your text editor.</p>
<p>Now let's give it a shot.<br>
  In your terminal enter the following code.</p>
<p><code>sudo openvpn --config /etc/openvpn/xirvik_vpn.ovpn</code></p>
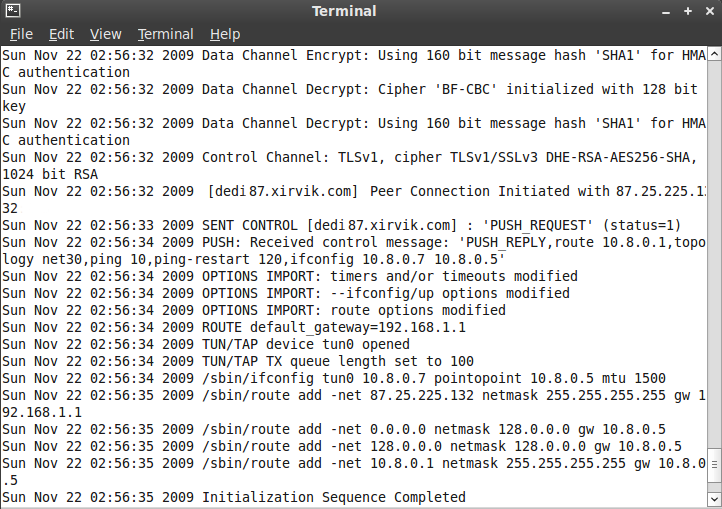
<p>Hit <strong>Enter</strong>, and it should start connecting.<br>
</p>
<p>Thats what a proper connection should look like once completed.<br>
To verify the connection, <a href="#testconn">click here</a> to jump to the end of this tutorial and test your connection. </p>
<p>To more quickly start the connection you can create an easy shell program.</p>
<p>In terminal type the following code:</p>
<p><code>echo openvpn --config /etc/openvpn/xirvik_vpn.ovpn > vpn.sh</code></p>
<p>This will create a new file called vpn.sh. When you want to connect open your terminal and type the following code to connect:</p>
<p><code>sudo bash vpn.sh</code></p>
<p>To close the connection hit Ctrl + C or close the terminal box.</p><br>
<h3><b><a name="mac" id="mac">Setting Up VPN on Mac OS X</a></b></h3>
<h5>(Section 3) <a href="#toc">(Table Of Contents)</a></h5>
<p>If you have Mac OS X 10.4 or later, it is possible to get OpenVPN working. Thanks to TunnelBlick.</p>
<p>Download the latest version of TunnelBlick from <a href="http://code.google.com/p/tunnelblick/">here.</a></p>
<p>Installation is the same as other Mac applications, and OpenVPN is included with the TunnelBlick GUI.<br>
The configuration files have to go into /Library/openvpn. <br>
For further information and support see <a href="http://code.google.com/p/tunnelblick/wiki/UsingTunnelblick#INSTALLING_TUNNELBLICK">here</a>.</p>
<h3><b><a name="testconn" id="testconnec">Testing The Connection</a></b></h3>
<p><span>To verify that you are successfully connected.. <br>
</span><span>First refresh your page.<br>
Check the sign below, if your IP has changed and your ISP is being read as something like OVH Systems, then mission complete! <br>
You have successfully setup the VPN correctly and are </span><span>routing all your traffic through your seedbox server!<br>

 <br>
  Don't forget to refresh this page in your browser, and then check again.</span></p>
That concludes the tutorial. <br>
You should now have no problems connecting through your VPN tunnel.<br>
<br>
Enjoy being anonymous!
<p></p>
#toca href=#toc#toc#toc

