This is an old revision of the document!
Proxy Tutorial
Your Xirvik seedbox comes equipped with its own proxy.
This is good because it anonymizes your connection, preventing people from finding your actual location.
Before we begin, please navigate to your Xirvik server page.
At the top of the page you'll find text that reads “Your server IP address: xx.xx.xx.xx”.
Copy the numbers, we will need them later.
For an example of what to look for, see the image below.

This tutorial covers how to use your Xirvik proxy with several different browsers.
Please follow the directions for all of the browers that you'd like to be protected through your server's proxy.
You may skip to the bottom at any time for instructions on how to test the connection.
Table of Contents
- Mozilla Firefox (Section 1)
- Internet Explorer (Section 2)
- Google Chrome (Section 3)
- Opera (Section 4)
- *Testing Your Connection
===== Setting Up Browsers ===== ==Mozilla Firefox== (Section 1) Table of Contents We will begin by opening up the Firefox Browser. Next navigate to Tools > Options (Alternately Hold Alt + T then click O)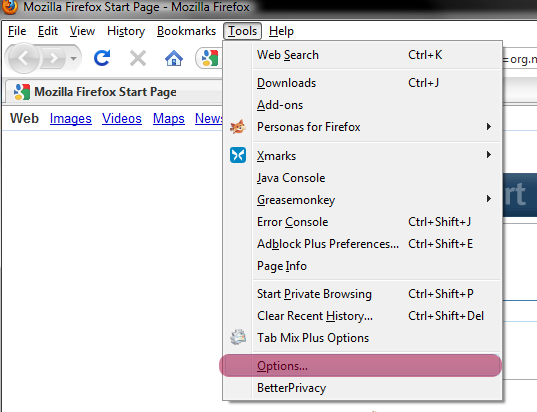 Next switch the main tab to Advanced, and the secondary tab to Network.
Under Connection hit Settings.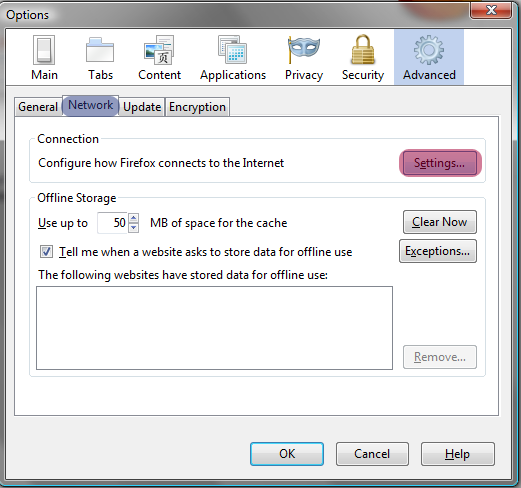 The dialog box seen below will appear.
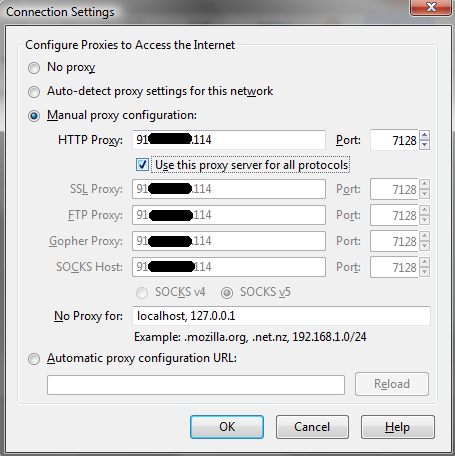
Check Manual proxy configuration,
The dialog box seen below will appear.
Check Manual proxy configuration,
Enter your Servers IP address for HTTP Proxy, and 7128 for the port. You may choose to select Use this proxy server for all protocols. However, it is not necessary.
 Finally, hit OK and you're all done!
==Internet Explorer==
(Section 2) Table of Contents
First open up Internet Explorer.
Next click the Tools button on the upper right (highlighted in the image below).
Finally, hit OK and you're all done!
==Internet Explorer==
(Section 2) Table of Contents
First open up Internet Explorer.
Next click the Tools button on the upper right (highlighted in the image below).
 Click internet options and switch the tab to Connections.
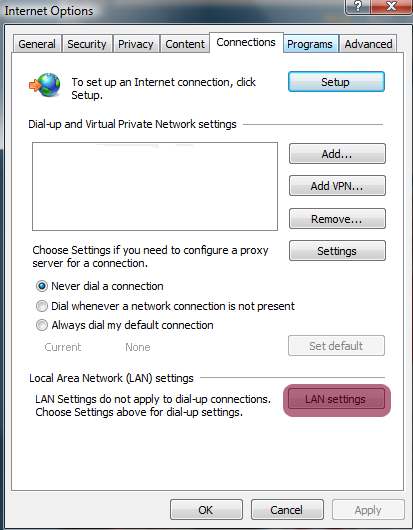 Clicking LAN settings will bring up the dialog box below.
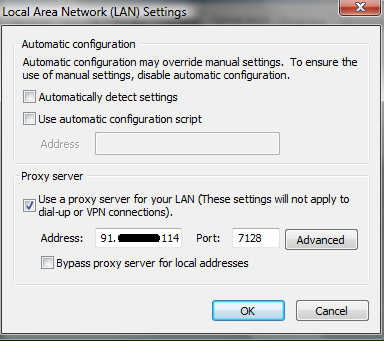 Once here check “Use a proxy server for your LAN”.
Then enter your server IP that we gathered at the beginning of this tutorial.
Once here check “Use a proxy server for your LAN”.
Then enter your server IP that we gathered at the beginning of this tutorial.
Enter 7128 for the port and hit OK. ==Google Chrome== (Section 3) Table of Contents Open up the Google Chrome Browser,
Navigate to the Wrench in the upper right-hand corner, then select Options.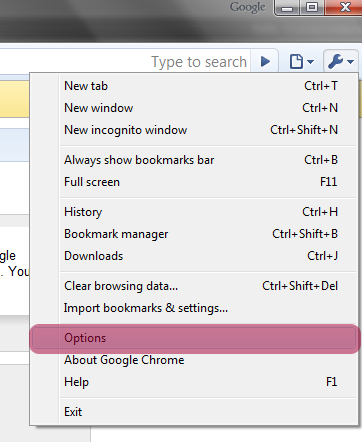 Once in Options, switch to the Under the Hood tab.
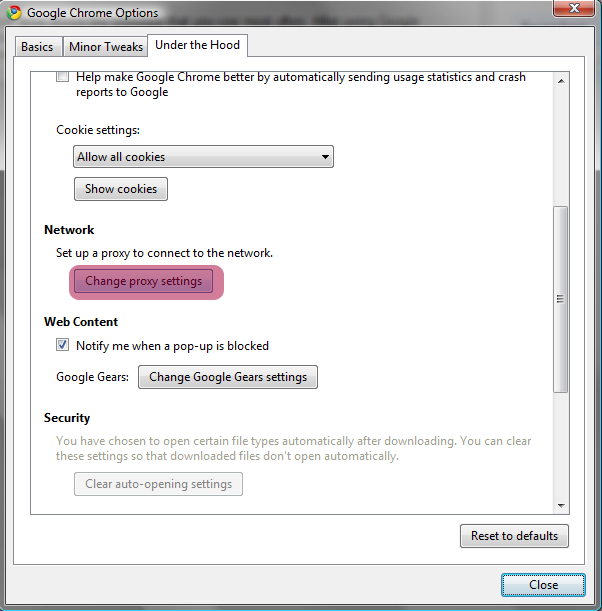 Under “Network” select Change proxy settings.
This takes you to the same Internet properties as in Section 2.
Where you can select LAN settings, and check “Use a proxy server for your LAN”. Finally enter your Server IP, and 7128 for the port. Hit OK and you're done! ==Opera== (Section 4) Table of Contents Filling out the Internet Options in the Control Panel or by following Section 2 or 3 you will apply the proxy to Opera as well. ===== Testing the Connection ===== We have setup the proxy server, now it's time to see if everything is working properly. This can be done with any browser! Go to your Address/Navigation tool bar, and type in www.WhatIsMyIP.com. Hit Enter. The browser should now ask you for authentication of some sort.
Enter in your seedbox username and password and hit OK**.


This will bring you to a website that tells you your IP address.

If you did everything correctly you should see the server's IP address that we gathered at the beginning of this tutorial.
Example:

If you do, then Congratulations! You have successfully configured a proxy on this browser!
Happy, and Safe surfing!
