Table of Contents
Firefox Plugin Tutorial
We've put together a great little FireFox plugin that will make torrenting way easier.
This plugin ensures that you spend more time on the important things in life, seeding/leeching, and waste less time say.. browsing your hard drive for torrent files.
Right now, you download a torrent, go to your seedbox, browse for the torrent file, click on it, and finally upload it to the server.
With this plugin we're going to bypass, well, pretty much all of that.
Now you can send a torrent file directly from your favorite tracker to your seedbox, with a simple two clicks.
For starters you can download the plugin from here. Open the .xpi file with FireFox to install it (or drag and drop it into a Firefox browser).
There's some quick set-up steps that i'll walk you through but we'll be ready for action in no time.
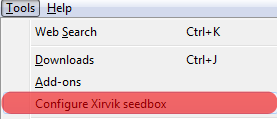
First step is to select Tools > Configure Xirvik seedbox from the top bar in your browser.
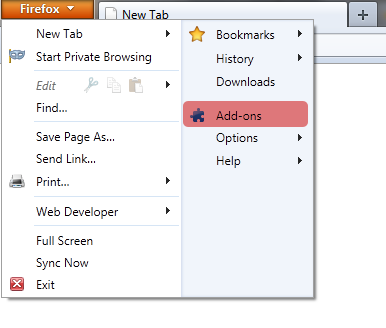
If you are on a more recent version of FireFox (4.0+), then it's a little different.
First, access the Add-on manager (shortcut: Ctrl+Shift+A) by finding the orange box to the upper left and choosing Add-ons from the drop-down menu.
An entry in the Add-on manager will look something like what you see below.
We will select Options to configure the plugin.

This page will be brought up. This is where we will be configuring the server information or linking the plugin to your seedbox.
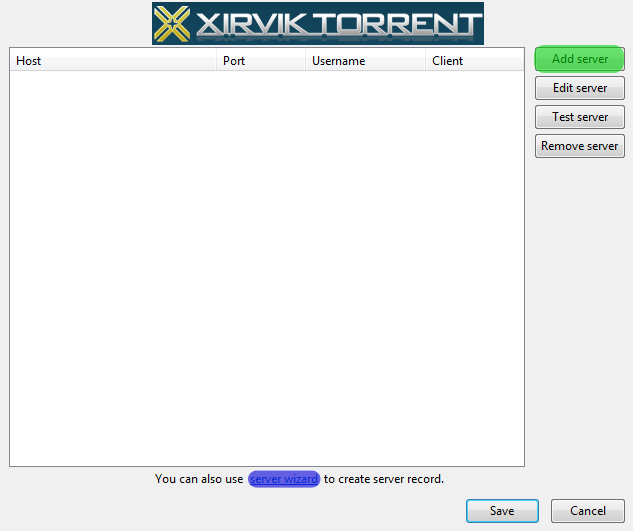
Now you have two options. Manual configuration or the Server Wizard.
Manual Configuration
Select Add server from the top right of the “Xirvik seedbox options page”.
Bringing up the “Server Info” dialog box.
Enter this information as recieved in your service activation email.
Don't forget the https: at the start of the host URL!!!
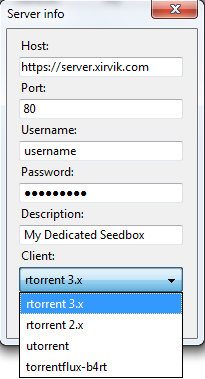
Leave “Port” at the default of 80.
If you wish to use a Client other than the default you can select it from the dropdown menu towards the bottom.
Don't forget to select Save to commit the changes and create the link to your seedbox.

That's all for the manual configuration!
Server Wizard
Select server wizard from the bottom of the seedbox info configuration page.
This will open an easy and intuitive wizard that will guide you through setting up your plugin.
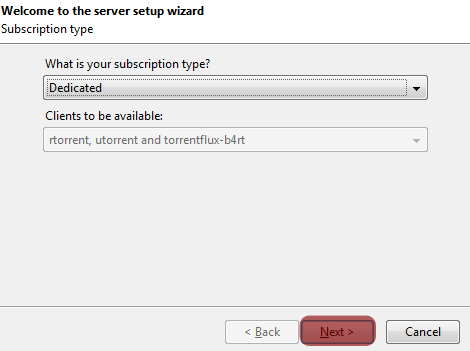
The first step is to select what type of subscription you chose. The options are Dedicated, Semi-Dedicated, or Shared.
Hit Next.
Now enter your access information just as you got it in your Service Activation E-Mail.
Don't forget the https: at the start of the host URL!!
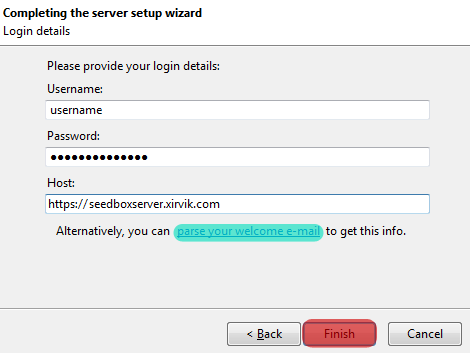
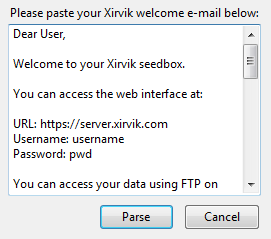
If you are lazy you can just copy the whole service activation e-mail, select parse your welcome e-mail and paste it in the dialog box.
Then hit Parse. This will extract the necessary information from the e-mail and correctly configure it for you.
Example:
Hit Finish after verifying that the information is correctly input.
Don't forget to Save after making any changes to the configuration..

At this point the plugin should be configured and ready for action!
Advanced Configuration Options
We also offer a few more configuration options for the more advanced user.
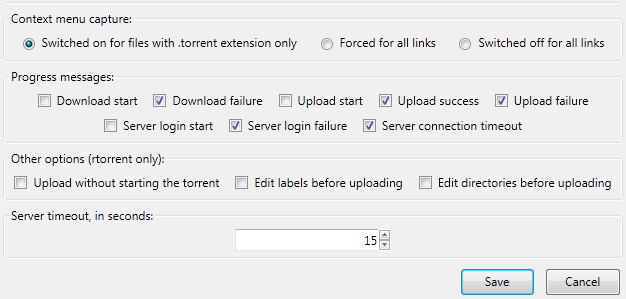
They are available at the bottom of the main plugin optiions window (as seen below).
Most users can skip to the next section, but if you want further customizability, read ahead.
Context menu capture
This section specifies when to show the seedbox upload entry on the a links context menu, depending on the type of link you right click on.
The first option “Switched on for files with the .torrent extension only” will trigger the upload entry only if the link is addressed directly to a torrent.
“Forced for all links” will show the entry regardless of what type of link it is.
The final option is to simply turn off the context menu support completely.
Progress messages
This portion is basic. When do you want to be notified of the plugins actions?
When it starts a download? When a download fails?
Or maybe you don't want any messages even when there is an error of some sort.
It's not recommended but you can deselect all of the checkmarks.
rTorrent-specific options
These settings only apply to rTorrent.
When enabled “Upload without starting the torrent” will send the torrent to rTorrent but it will be inactive.
This way, nothing will begin downloading in rTorrent, until you explicitly start it from the rTorrent client.
When enabled “Edit labels before uploading” will allow you to give the torrent a label within rTorrent prior to uploading.
When enabled “Edit directories before uploading” will prompt you to change the download location on your seedbox hard drive.
Server Timeout
This option specifies the number (in seconds) that the server has to respond before the connection is cancelled.
The default of 15 is typically not problematic, but if you run into errors you can try increasing it.
Don't forget to Save after making any changes to the configuration..

Testing & Demonstration
Now let's test it to make sure everything was input correctly and works!
First step is to try an “artificial” test, or a test that doesn't involve torrents.
To do this return to the the seedbox configuration page, highlight the seedbox we just entered and select Test server.
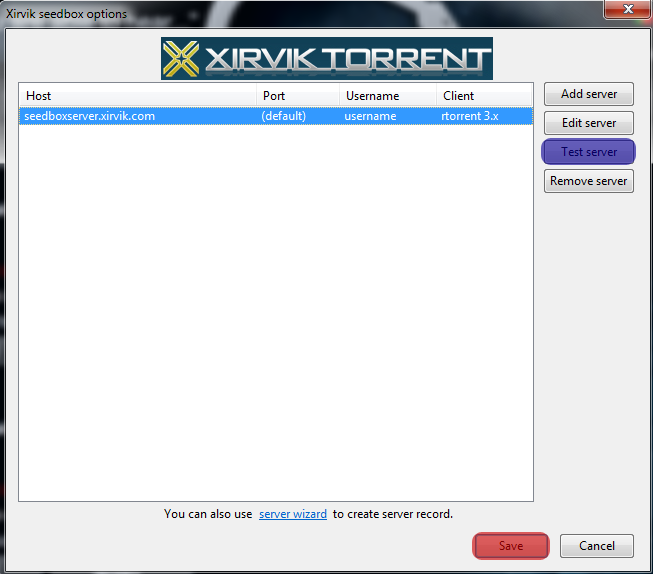
This is the result we're looking for.

Now for an actual test/demonstration to verify that it's working.
First let's hit Save to make sure our configuration is saved.

Go to your favorite torrent tracker, and right click on the download link of a torrent as seen below.
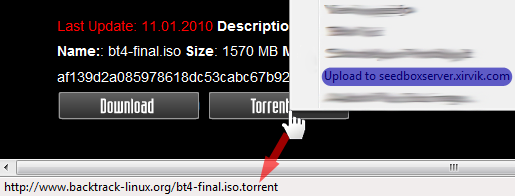
Select Upload to yourserver.xirvik.com.
Remember: You may add as many servers as you'd like and then select which seedbox to upload the torrent to from the context menu (as seen below).

Another upload method is to click on a torrent download link.
Then select the option Upload to Xirvik and choose your server from the dropdown menu.
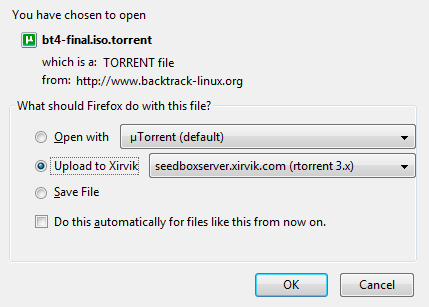
Hit OK to send over the torrent!
You know that the upload was successful if you recieve this message.

Next, go to your seedbox client if you wish to double-check that the transfer actually went through.
Over time you'll learn to trust that the plugin sent it over without a problem!
That ends the tutorial!
If you have any problems, feel free to contact us!
Thanks for choosing Xirvik.


